Unity SDK User’s Guide#
Introduction#
The Rave Unity SDK provides integration for Unity Editor, iOS and Android.
Getting Started#
Note
Before proceeding with the SDK integration, make sure to include the External Dependency Manager for Unity (EDM4U) in your Unity project. EDM4U (formerly Play Services Resolver / Jar Resolver) is required to resolve dependencies for iOS and Android builds.
If you are using the Unity package, it includes a copy of EDM4U (v1.2.182). If your project already has EDM4U installed, you can safely skip importing it during the SDK installation process.
If you are using the tarball distribution, make sure to manually install EDM4U before integrating the Rave Social SDK.
For more details, refer to the official EDM4U documentation at: googlesamples/unity-jar-resolver.
To get started, navigate to the “RaveSocial” menu in the Unity Editor and click on “Update Configuration”. This will open a settings panel where you can provide the necessary configuration values for the Rave Social SDK to work.
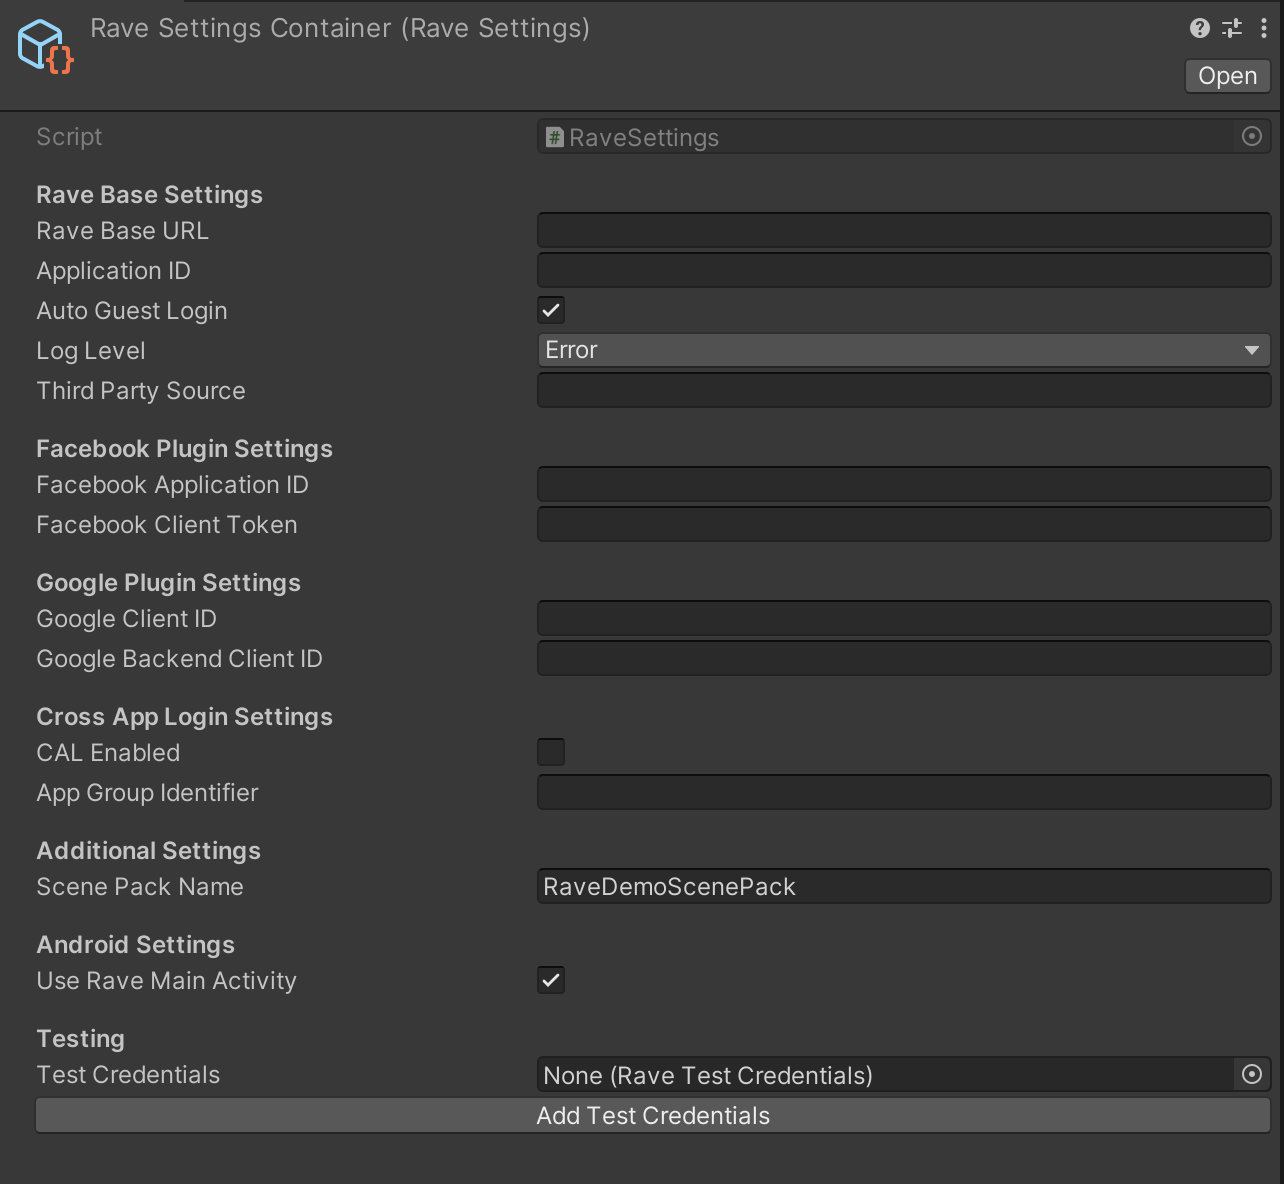
The Base URL and the Application ID values are specific to your application, and should be given to you beforehand. Additionally, you will need to configure the other settings according to the features you want to enable. Once you’ve entered all the required configuration values, your plugin SDK should now be configured and ready to use.
Please note that the specific configuration values required for your plugin may vary depending on its functionality and requirements. For more information on what values need to be provided and how to configure your plugin for optimal performance, please refer to the documentation or support resources (see the Configuring an Application section).
iOS Unity Integration API#
Note
To integrate Rave support in your Unity project, you will need to add Rave’s .cs and the platform-specific library files to your project and some code to initialize Rave on the Unity side.
Setting Up the Rave SDK#
After this setup, you can start using Rave SDK in your Unity project. We will explain the example code below to get you started.
Import the RaveSocial unitypackage from the SDK distribution into your Unity Project. This includes all the C# and platform native plugins.
Add this code to the Start() function of any GameObject that exists when your game first opens. This code needs to be executed before any other Rave-related code is used:
void Start () {
        RaveSocial.Initialize();

        // ... other startup code
}
Export to XCode Project and Add Rave SDK#
Ensure the settings in the Rave config panel (Menu “RaveSocial > Update Configuration”) are correct for your application.
From the File menu pick Build Settings
In the Build Settings dialog pick iOS
Click Build and pick a location for the exported project
Open the .xcproj in the folder that you exported
Add the AuthenticationServices framework to the list of linked libraries in the application’s settings.
If you are using Sign In With Apple, add the capability to your project now, too.
Android Unity Integration API#
Note
To integrate Rave support in your Unity project, you will need to add Rave’s .cs and the platform-specific library files to your project and some code to initialize Rave on the Unity side.
Setting Up the Rave SDK#
After this setup, you can start using Rave SDK in your Unity project. We will explain the example code below to get you started.
Import the RaveSocial unitypackage from the SDK distribution into your Unity Project. This includes all the C# and platform native plugins.
Add this code to the Start() function of any GameObject that exists when your game first opens. This code needs to be executed before any other Rave-related code is used:
void Start () {
        RaveSocial.Initialize();

        // ... other startup code
}
Build the Android Scene Pack AAR#
Open your Android project where you build your custom scene pack. Or, open the Android demo project included in the Rave SDK distribution to build the demo scene pack.
Verify the resources folder contains the custom assets for your project (or the ones from the demo scene pack).
Build the scene pack module.
Copy the resulting scene pack AAR file from build/outputs/aar/ to Assets/Plugins/Android/.
Build and Run the Android APK#
From the File menu pick Build Settings.
In the Build Settings dialog switch to Android.
Verify the settings in the Rave config panel (Menu “RaveSocial > Update Configuration”) are correct for your application.
Click Build and Run to build an APK and run it.
Initializing the SDK#
Using Rave in Your Unity Project#
You can now use the Rave functionality exposed in the RaveSocial package in your Unity project. An example is provided below, which illustrates how to get the Login dialog to show up and to get a callback notification when a Login is finished.
First, after our initialization code, we set the Login Callback so that we can be notified when our Login status changes:
void Start () {
        RaveSocial.Initialize();
        //set our callback to the function LoginCallback which we will define
        RaveSocial.SetLoginStatusCallback(LoginStatusCallback);
Then we make a function to handle what happens when the login status changes. We set the member variable loggedIn to true if they have logged in to a non-guest account:
void LoginStatusCallback(RaveLoginStatus status,string error)
{
        if(status == RaveLoginStatus.RaveLoggedIn)
        {
                if(RaveSocial.IsLoggedInAsGuest()) {
                        Debug.Log ("~~~logged in as guest!");
                        isLoggedIn = true;
                } else {
                        Debug.Log ("~~~logged in!");
                        isLoggedIn = true;
                }
        }
        else if(status == RaveLoginStatus.RaveLoggedOut)
        {
                Debug.Log ("~~~logged out!");
                isLoggedIn = false;
        }
        else
        {
                Debug.Log ("~~~login status error - " + error);
        }
}
Now we can add some code that creates a button. When clicked, this button shows the Login Dialog:
void OnGUI () {
        //...
        if(GUI.Button(new Rect(buttonLeft,buttonTop,buttonWidth,buttonHeight)), "Login")) {
                if(!loggedIn)
                        RaveSocial.ShowLoginScene();
        }
        //...
}
After the user finishes using the Login Dialog, we will be asynchronously notified when the server has finished logging in or logging out the user.
Unity C# Callback Examples#
Callback with Declared Function#
RaveSocial.SetLoginStatusCallback(LoginStatusCallback);

void LoginStatusCallback(RaveLoginStatus status,string error) {
    if (RaveSocial.HasError(error)) {
        // handle error
    }
    // Process callback
}
Callback with Anonymous Function#
RaveSocial.SetLoginStatusCallback(delegate(RaveLoginStatus status,string error) {
        if (RaveSocial.HasError(error)) {
            // handle error
        }
        // Process callback
    });
Built-In Experiences#
The BFC SDK comes equipped with a set of pre-built Big Fish Games experiences. They can be easily and quickly integrated into any Big Fish mobile game to provide a consistent experience for basic game personalization features like Player Login, and Player Profile Management.
Although these experiences by default reflect the look and feel of the Big Fish brand, they can be customized to fit the look and feel of individual games by changing the skin and layout of individual features.
See the Personalizing the Built-in Experiences section to find out how to personalize these experiences.
Player Login Experience#
The default Login experience allows the player to log in, and create a new gamer account via any of these methods:
Sign up with a new email address
Sign in with an email address associated with player’s Big Fish ID account
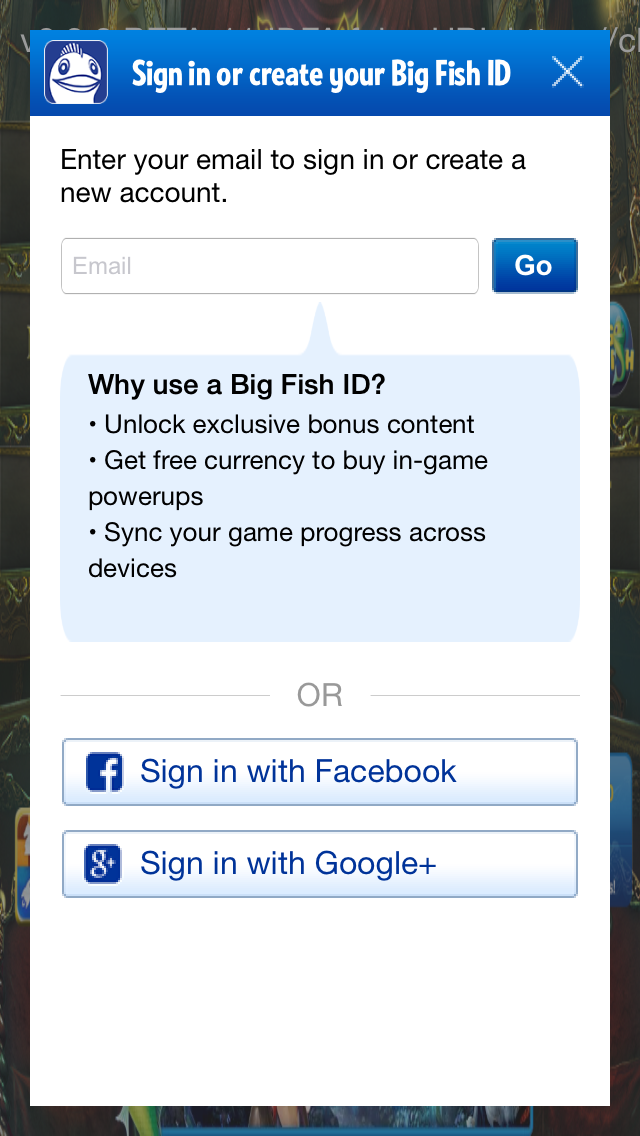
In order to integrate this scene it’s important that the Facebook and Google apps used in the Rave integration are properly configured. Please see Integrating Third Party Social Providers section for instructions on how to configure the social networks apps.
Sign up data is somtimes returned in certain regions for new users. See Getting COPPA or CASL Information from User Sign Up section for more on this.
To integrate the sign-up experience:
RaveSocial.ShowSignUpEmailScene(delegate(RaveCallbackResult result, BigFishSignUpData signUpData, string error) {
  if (result == RaveCallbackResult.RaveResultError) {
    // handle error
  } else if (result == RaveCallbackResult.RaveResultCanceled) {
    // handle canceled
  } else if (signUpData != null) {
    // handle the sign up data if needed (canada, us)
  } else if (result == RaveCallbackResult.RaveResultSuccessful) {
    // there is no sign up data returned for other regions
  }
});
To integrate the Login experience:
RaveSocial.ShowLoginScene(delegate(RaveCallbackResult result, BigFishSignUpData signUpData, string error) {
  // same as above
});
Registering and Handling Login Callbacks#
RaveSocial provides key Scene and Login status callbacks that a developer can register and listen to.
Login Status Notification#
The general Login Callback (not to be confused with the RaveLoginScene callback) is used to notify the developer
that a login status change of some kind has occured. This is useful because it may indicate that some social features
are now available.
RaveSocial.SetLoginStatusCallback(delegate(RaveLoginStatus status, string error) {
  if(status == RaveLoginStatus.RaveLoggedIn) {
    isLoggedIn = true;
    if(RaveSocial.IsLoggedInAsGuest()) {
      // respond to guest status
    } else {
      // respond to loggedIn status
      // at thish time you may also check different fields of the current user
      // by accessing RaveSocial.usersManager.current
    }
  } else if(status == RaveLoginStatus.RaveLoggedOut) {
    // respond to logging out
  } else {
    // respond to the error condition
  }
});
Directly Logging In to Authentication Providers#
If using the built-in Big Fish Login experiences is not desired, developer can build completely custom login experience using Rave’s login APIs.
Using our loginWith API, you can directly invoke a login via Facebook or Google. Please use the following
constants:
RaveConstants.CONNECT_PLUGIN_FACEBOOKRaveConstants.CONNECT_PLUGIN_GOOGLE
RaveSocial.LoginWith (RaveConstants.CONNECT_PLUGIN_FACEBOOK, delegate(bool loggedIn, string error) {
    //  result handler
});
Checking Readiness of Authentication Providers#
Just like with the direct login API - you can also see if an authentication provider is ready to be used. “Readiness” indicates
that a user has connected this social account to their Rave Social account and also that the token or local
authentication for this social account was successful. Call convenience functions in RaveSocial to check a plugin’s
readiness. If a plugin is not ready but you desire a ready status, use the matching connect methods in RaveSocial
to establish a connection with the the desired plugin.
RaveSocial.CheckReadinessOf (RaveConstants.CONNECT_PLUGIN_FACEBOOK, delegate(bool ready,string error) {
    // handle result
});

//  connecting to Facebook if it fails a readiness check
RaveSocial.ConnectTo (RaveConstants.CONNECT_PLUGIN_FACEBOOK, delegate(bool loggedIn,string error) {
    if (loggedIn) {
      // handle successful connection
    } else if (error != "") {
      // handle error
    } else {
      // otherwise the user cancelled the operation
    }
  }
});
Player Profile Management Experience#
The profile management experience screen allows players to build out their game profile by adding a profile picture, email, and display name, as well as connecting various social networks to connect with friends.
This screen will also have a link to login or sign-up if the user hasn’t done so already.
To integrate the Profile Management experience:
RaveSocial.ShowAccountInfoScene (delegate(RaveCallbackResult result, BigFishSignUpData signUpData, string error) {
  // handle any login or sign-up actions here
});
Find Friends Experience#
The Find Friends screen allows the player to connect their Facebook and Google accounts, and their local Phonebook to find friends who are also playing Big Fish games.
As the player connects his social network account to his gamer account, Rave will keep track of which of player’s friends are also playing Big Fish games and will add those friends to the list of player’s gamer contacts. These friends will be available in games for in-game interactions such as sending gifts to them and for social leaderboards.
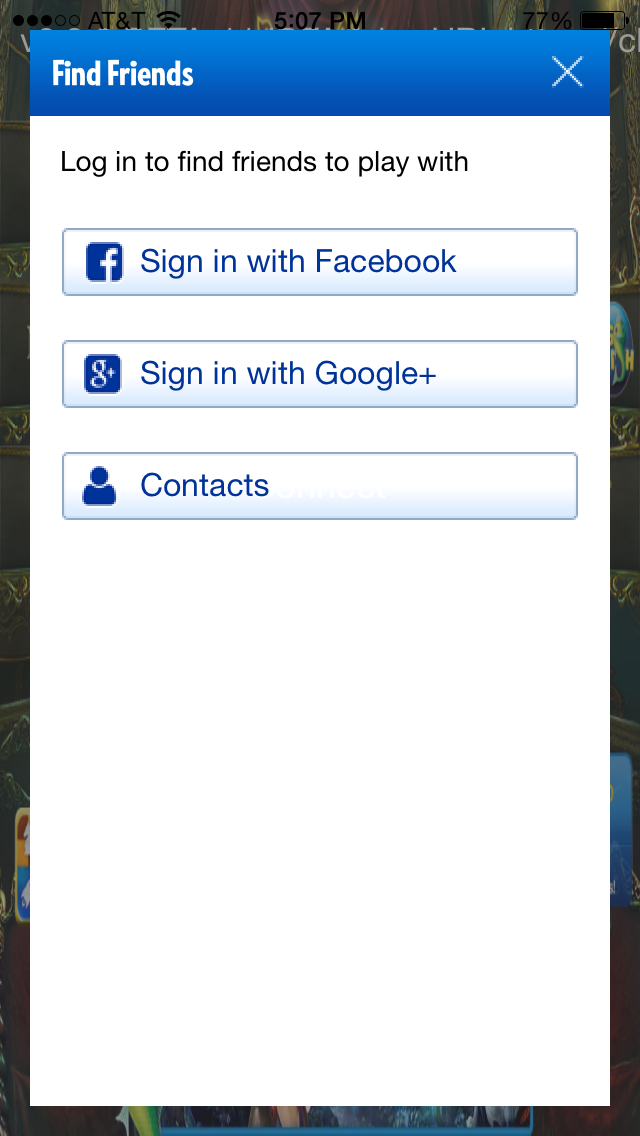
To integrate the Find Friends experience:
RaveSocial.ShowFindFriendsScene (delegate(string error) {
  if(error != "") {
    // check for error
  }
});
Getting COPPA or CASL Information from User Sign Up#
If you are in the US region and need information about a new user’s COPPA compliance, or are in the Canadian region and need information about whether the user has accepted newsletter sign-up, this data can be checked by setting a callback on RaveAccountInfoScene, RaveLoginScene and RaveSignUpEmailScene. Note that signUpData can be returned as null in certain situations.
The newsletter name for sign up can be set in the setting BigFishSettings.General.NewsletterName
An example usage:
RaveSocial.ShowAccountInfoScene (delegate(RaveCallbackResult result, BigFishSignUpData signUpData, string error) {
  if (result == RaveCallbackResult.RaveResultError) {
    // handle error
  }
  if (signUpData == null) {
    // no sign up data (maybe it was cancelled)
  } else {
    // For Canada:
      // signUpData.acceptedNewsletter tells you if the user opted-in to receive newsletter
    // For US:
      // signUpData.passedCoppaCheck tells you if the user's age is COPPA Compliant
      // signUpData.birthYear will contain the user's year of birth
  }
});
Users and Identities#
At the core of Rave’s game personalization is the concept of a player’s gamer account. This account reflects the gamer identity of an individual person who maybe be playing several Big Fish games across many different devices, including iPad, iPhone, Android phones, and Android tablets.
Every Big Fish gamer account has a globally unique Rave ID, a 32-digit hex number, which can be used to uniquely identify the player for game logic purposes. This Rave ID is created when the player first begins playing a Big Fish game, even if they have not logged in with an explicit authentication method such as Facebook. We will refer to a user that has a Rave ID, but no authentication or personalized data associated with their account as an anonymous user. This Rave ID is persisted for the lifetime of that player’s account.
Later as the player continues to build out their gamer profile by adding a display name or email address to their account, the player will move to the “Personalized” state.
Once the player logs in with any of the available authentication methods, they will move to the “Authenticated” state. Today the available methods of authentication are Big Fish ID, Facebook and Google.
As the player plays more Big Fish games across more devices and continues to build out their profile by connecting additional social networks and additional pieces of personal information (e.g. a profile picture), these attributes are attached to their Rave ID and they can be accessed via the User API. The figure below gives a logical representation of a player’s account and all attributes associated with it.
Attribute |
Description |
|---|---|
UUID |
A 32-digit hex number that acts as the Rave ID for the user. It is assigned when a user is created and is immutable. Note that although the value is immutable, multiple Rave accounts can be merged into a single account. Thus the primary UUID referencing a user may change over time |
Account state |
A user can be in one of three account states: anonymous, personalized, or authenticated. See Player Account States for more information. |
Username |
A unique username in the Rave system. It can be changed, but at any given time it must be unique. Given that it can be changed, it should not be used in place of the UUID to refer to users. It is intended for display purposes. |
Display name |
A non-unique display name for the user |
Profile image URL |
A URL for the user’s profile image |
User’s email address |
|
Birthdate |
User’s birthdate |
Gender |
User’s gender |
FB UIDs |
One or more Facebook UIDs can be associated with a user. |
Google UID |
The user’s Google UID if they have connected to Google. |
Devices |
A list of devices associated with the user |
Sessions |
A list of active sessions a user has. Each application/device combination where a user is using Rave requires an active session |
Merged identities |
A list of user accounts that have been merged in to this user account. See Merged IDs for more information. |
User State Transitions#
A player’s Rave ID can change on a specific device when any of the following is true:
The device is reset when the player was in the “Anonymous” state
The player logs in to an account that was previously created on another device. This transitions the user on the curent device from the anonymous state to the authenticated state and the anonymous account they had been using on this device is automatically merged in to the account that they logged in to. A list of merged anonymous Rave IDs for an account and can be accessed via the User API.
The player opens game the first time after his account was merged with another account and the primary Rave ID was generated on the other device. See Merging for more information.
Player Account Identifiers#
As the player continues playing Rave-enabled games, over time they can add more information about themself and build out their gamer profile. They can connect his Facebook and Google accounts, create a display name and a username, as well as add a profile picture.
Player Account States#
A player account will be in one of the following three states, which will affect their ability to use different Rave features.
Anonymous - The player hasn’t provided any information to identify their account
Personalized - The player shared personal information such as email, but didn’t associate any information to be able to securely identify himself in the game. Secure authenticating identities include Big Fish ID, Facebook and Google.
Authenticated - Player connected and logged in with one or more of these identities: Facebook, Google, Big Fish ID
Player Value Scopes#
It is possible to apply an application scope to a subset of a user’s attributes. For each application, the display name and profile image can be configured to either use global or app-scoped values. This behavior can be controlled with the User value scope setting for an application in the Rave portal (see the Configuring an Application section).
When the App scope option is selected for an application, the following behaviors are enabled:
Display names and profile images that are set in the application are only visible in that application
Display name and profile image values displayed in the application will either be the app-scoped values, if set, or the global values if no app-scoped values have been set.
If a user removes an app-scoped value that they have set, the value displayed in the application will become the global value.
When the default scope Global is selected, display name and profile image are shared across all other apps that have Global scope selected.
Merging#
As of Rave SDK v2.9, complete player account merging is supported.
When a user is logging in to apps and games using different social networks on different devices, the user will be identified initially as different distinct users and as a result, there will be multiple Rave IDs defined for this user. As Rave observes the associations between this user’s social networks, it will collect a list of the identities for this unique user by way of merging them under a single Rave ID.
Example: Bob logs in to a game on his iPad using Facebook. Later, Bob logs in to a different game on his Android device using Google. At this moment, Bob has 2 different accounts (one for the Facebook login on one device, another for the Google account on his other device). Now Bob decides to request some gifts from his friends using Facebook on his Android device which he had only logged in to using Google. At this point, Rave is able to identify that Bob has used two accounts and Bob’s accounts are now merged into a single identity with the previous identity stored safely and without loss. Bob’s single Rave account is unified and for all future logins, he will be identified under the one unique account.
How Merging Works#
When an anonymous or personalized user logs in to an existing Rave account, or any user connects to an existing Rave account while already authenticated, Rave will merge all data (social data such as friends list and game data such as leaderboard scores) from the currently logged in user to the existing Rave account of which the user is trying to connect or login as. The result is a single Rave ID which has all of the combined associations with social networks and combined data from both accounts. To the user, it will simply appear as though the login or connect action worked without issue.
Rave maintains the list of all Rave IDs merged into the current account. See Merged IDs for information.
The merge function is triggered when RaveSocial.connectTo is used to connect the current user using authentication data already associated with another Rave user account. The result of the merge is a single user which maintains the previous identity as well as a combined set of both user’s data. This feature is enabled by default. To disable this feature, disable the Rave setting RaveSettings.General.AutoMergeOnConnect.
In a user merge case, the source user (currently logged in) is merged into the target user (existing Rave user matching connect credentials). The source user is then logged out after the merge is complete and the newly merged-in-to target user is logged in. The currently logged in Rave ID will switch from the source user to the target user. Any devices logged in with the source user will also switch to the target user automatically. Any devices logged in as the target user will be unaffected except for the data updates.
Merged IDs#
Rave creates a new Rave ID for every new anonymous player session when the setting RaveSettings.General.AutoGuestLogin is enabled. When an anonymous player subsequently logs in via, for example, Facebook, the Rave ID from the anonymous session is merged into the authenticated account. Account merge also happens when a logged in player attempts to connect a social network account (ie. Facebook) that is already connected to another Rave ID. The account is merged and the other Rave ID is stored in the list of merged IDs for the player’s account.
Obtaining the list of merged identities is available via the API RaveUsersManager.fetchIdentities. Please refer to the platform SDK API documentation for more information on usage.
Merged Data#
When two users are merged together, the users data is also merged using the following rules:
Identity - The source user’s RaveID will be added to the target user’s identities.
Contacts - The target user will retain its contacts and add all contacts of the source user.
Facebook, Google and other associations - The target user will add the associations from the source user for all social networks.
Leaderboards - The target user will use the best high scores earned between both the source and target user.
Achievements - The target user will keep all unlocked achievements from both the source and target user.
Gifts - The target user will keep all gifts from both the source and target user.
Accessing the Current User#
Once you have successfully logged in you can access the current user
//  to access the current user use the following snippet:
RaveUser currentUser = RaveUsersManager.Current;

//  to update the current user use the following code:
RaveUsersManager.UpdateCurrent(delegate(string error) {
    if(error != "") {
        //  handle the error condition
    } else {
        //  perform operations on RaveUsersManager.Current
    }
});

// to access the RaveID and other values for the current user use the following snippet:
//  access is also provided to the current user through RaveSocial
RaveUser currentUser = RaveUsersManager.Current;
string raveID = currentUser.raveId;

if (! currentUser.isGuest) {
    //  perform some action if the user is or isn't a guest account
    string bfId = currentUser.thirdPartyId;
    string fbId = currentUser.facebookId;
    // etc.
}
Friends and Followers#
Note
Friends and Followers functionality is currently under deprecation. Please contact the Rave Social support representative for additional info.
Rave Social has an advanced in-game social graph management system which makes it easy to establish connections between users to create a social graph around your apps. Rave supports both Friends (private, or two-way) and Followers (public, or one-way) relationship models, and the Friends lists and Followers lists can be configured to be app-specific, or shared across several apps.
Both relationship models use similar APIs and concepts but have key differences in how relationships are established and maintained.
Friends#
Friends are two-way relationships between users, which require one person to send a Friend request, and the other to accept that request to establish the relationship. A user can send a friend request to any other user and they may either accept or reject the request.
Followers#
Followers are one-way relationships between two users. A user can follow any other user without the requirement to first send them a request. It is possible for the other user to reciprocate and also follow the first user, but in a reciprocating following relationship, where two users follow each other, the outcome is still two independent relationships and not a Friend relationship. The only way to get a Friend, or two-way relationship is to use the Friends model.
Lists#
Every app in the Rave system can use one or more lists of Friends and Followers. By default Rave generates one list of Friends and one list of Followers at the time a Rave application is created. These lists are private to that app. Rave also creates global Friends and Follower lists, which are accessible to all of a publisher’s apps. A developer can create any number of custom lists on top of these four lists for their application. Every list can be either a Followers or Friends list, but not both. Lists are created in the Rave portal. Lists are independent - adding friends or followers for a user to a list does not add those relationships in any other list.
Scopes#
Each list is assigned a specific scope. Scope can be either Global or Application. A globally-scoped list is read-write permission across all applications for the publisher. Application-scoped lists are only accessible to a specific application. Other applications cannot access an application-scoped list that is not created for them.
Querying#
In order to get the most up to date list of relationships for a given list, each lists must be individually
synced from the server to the client via a call to update* in the associated feature manager in the Rave SDK.
To sync Friends, you would call the updateFriendsList method in RaveFriends.
Once a list is synced, it can be queried in a number of ways using the query builder methods provided by the feature
manager.
To start a query in a Friends list, you would call the friendsListQuery method in RaveFriends, or
to start a query in a Followers list, you would call the followersListQuery or followingListQuery in
the RaveFollowersManager. Queries enable modern user experiences, such as autocomplete, partial data searches
and pagination.
Friends and Followers classes#
RaveFriends / RaveFriendsManager - Provides all friends feature functions.
RaveFriend - A friend
RaveFollowers / RaveFollowersManager - Provides all follower/following feature functions.
RaveFollower - A follower or followee
ListQueryBuilder - A query builder which provides a list of friends or followers
SearchQueryBuilder - A query builder which provides a search filter within a ListQueryBuilder
Friends and Followers examples#
Update list of friends#
[RaveSocial.friendsManager updateFriendsList:listKey callback:^(NSError *error) {
    if (error) {
        // handle error
        return;
    }
    // handle the successful update of the list
}];
Query all friends in list#
[[RaveSocial.friendsManager friendsListQuery:listKey] get];
Query some friends in list#
This will query 5 friends starting at offset 10 in order of display name
[[[[RaveSocial.friendsManager friendsListQuery:listKey] orderBy:RaveRelationshipOrderByDisplayName] offset:10 limit:5] get];
Find user to request#
RaveUserReference* userReference = [RaveUserReference byEmail:@"myfriend@gmail.com"];
[RaveSocial.usersManager fetchUser:userReference callback:^(id<RaveUser> user, NSError *error) {
    if (error) {
        // handle error
        return;
    }
    // send request, follow, block, etc
}];
Send friend request#
[RaveSocial.friendsManager sendFriendRequest:listKey reference:userReference callback:^(NSError *error) {
    if (error) {
        // handle error
        return;
    }
    // success!
}];
Accept friend request#
[RaveSocial.friendsManager acceptFriendRequest:listKey friendId:raveId callback:^(NSError *error) {
    if (error) {
        // handle error
        return;
    }
    // success!
}];
Reject friend request#
[RaveSocial.friendsManager rejectFriendRequest:listKey raveId:raveId callback:^(NSError *error) {
    if (error) {
        // handle error
        return;
    }
    // success!
}];
Update list of followers#
[RaveSocial.followersManager updateFollowersList:listKey callback:^(NSError *error) {
    if (error) {
        // handle error
        return;
    }
    // handle the successful update of the list
}];
Query followers#
[[RaveSocial.followersManager followersListQuery:listKey] get];
Follow user#
[RaveSocial.followersManager followUser:listKey reference:userReference callback:^(NSError *error) {
    if (error) {
        // handle error
        return;
    }
    // success!
}];
Unfollow user#
[RaveSocial.followersManager unfollowUser:listKey raveId:raveId callback:^(NSError *error) {
    if (error) {
        // handle error
        return;
    }
    // success!
}];
Invite a friend by sending a friend request#
In order to send a friend request to a user who may not have the application installed aleady, two APIs are used in the RaveFriendsManager class. createFriendRequestTokenForList will generate a one-time token that the user can then send to their friend via SMS or e-mail. It is recommended that deep linking is used in this case to direct the user to download the application from the app store, or if they already have the application launch the application with this token passed in as a parameter.
In your callback that handles the deep link, this one-time token can be consumed via the claimFriendRequestToken method. Upon consumption, Rave will create a friend request that will be presented when the friend requests are updated and can be accepted via the normal means.
Account Conflict Resolution#
Attention
To avoid unwanted conflicts it is critical that each app in your portfolio uses a consistent business mapping with Facebook . If incorrectly configured users that could be identified as the same across your portfolio will be misidentified as different users potentially leading to account conflicts later.
There are two types of conflicts that can occur when attempting to attach credentials to a Rave account. In the simpler case where different credentials of the same kind are already associated with current account the user will be offered the opportunity to use the new credentials instead. In the case where the credentials are already associated with a different Rave account several things can happen depending on your integration:
The default configuration will prompt the user to contact support.
The next option is to configure RaveSettings.General.AllowForceDisconnect to true. This will prompt the user to confirm that the current credentials should be forcably connected to the current user and removed from the old user.
Finally if the integration has set a merge policy then it will give you the opportunity to let the user choose whether or not to merge the current user with the user that already has these credentials associated. If so the current user will be merged into the foreign user. This cannot be undone and has implications across your portfolio so please consider carefully how best to implement this policy.
Rave supplies a default merge policy with your scene pack that provides a user merge dialog that you can customize or replace but you must explicitly set the provided policy as the current policy. By default no policy is set so merging is disabled.
Transitioning from Rave ID as a Save Game/Cloud Storage ID#
In the past you may have used Rave ID as a means to index user data stored on your own servers. There are downsides to this approach that you may have encountered including Rave ID changing for the current user. To create a more stable environment for data indexing we have created Application Data Keys.
Save Game/Cloud Storage ID with App Data Keys#
AppDataKeys provides a stable index for a given Rave user and application giving you the same key under most scenarios regardless of account changes. In the typical scenario the user’s Rave ID would be the index and would remain stable over the life of the application. Common scenarios include:
* Server-stored savegame keys
* Cloud storage indexing
* Any application data which can be accessed via a RaveID
When a merge between two accounts that have active sessions for your application should happen AppDataKeys provides an easy mechanism to resolve which key should be used to continue by giving your application a list of the possible index candidates. Your application can take that list, find indentifying information from your cloud storage and let the user choose or you can automatically chooose for them. For more information on AppDataKeys see Using App Data Keys for Save Game or Cloud Storage ID and AppDataKeys API.
Contacts#
Adding Friends from Contacts Providers#
As a user connects to a social network, like Facebook, Rave automatically finds your friends that use Rave. No additional integration work is necessary. In the particular case of Facebook, when the Rave client notices that your Facebook friends have changed it will update your Rave friends through the backend. All of this is taken care of for you automatically once you have successfully logged in using Facebook, or some other authentication provider. A user’s phonebook will also automatically be searched for Rave friends when they are first logged in.
Rave Social’s contacts API allows the developer to manage a list of contacts associated with the current user and interact with contacts from all supported social media sources as well as the local device phonebook.
Automatic Syncing#
Rave will opportunistily update contacts based on a few settings and emergent SDK usage. Upon completion of connect, if RaveSettings.General.AutoSyncFriends includes the pluginKeyName for the social provider you’re using then, your contacts will sync automatically. Otherwise automatic syncing will be performed when updating contacts caches no more often than the time interval specified by RaveSettings.General.AutoSyncInterval.
RaveContact#
This class implements a single Rave contact. A Rave contact is stored on the server and can be retrieved using the
RaveContactsManager. The Rave API will attempt to associate a contact on the server with an existing Rave user.
Social networks associated with a Rave account will be used to automatically fetch the user’s friends. Those friends
that have an associated Rave account are added as contacts.
In addition to Rave contacts stored on the server, a social network can also be used to temporarily fetch a list of the user’s friends. These are known as external contacts and are only available as a result set from a fetch operation. They are not sent or stored on the server, but can be used locally by the application.
Both Rave contacts and external contacts contain the following information, if available:
externalIds - contains a dictionary of the user’s ids on other networks. the keys are the source networks and the values are the ids.
displayName - A contact’s chosen display name. Usually obtained from the source of the contact (FB, Google, etc…)
pictureURL - A URL to the contact’s profile picture
thirdPartySouce - Name of the third party source this contact originated from. A third party source is typically
customer-specific, and outside the standard list of supported social networks
key - Unique identifier for the contact, even if the contact is an external contact and not associated with a Rave
user
RaveContactsManager#
This class implements all functions related to managing contacts in the Rave API. The manager stores contacts in a local
cache that can be retrieved using RaveContactsManager.All. Before the local cache is used, it should first be
updated, by retrieving information from the server, using the Update family of functions. After the first update,
contacts information can be quickly retrieved from the cache and updated from the server only as needed.
Contacts can be deleted from the Rave backend server and added in a few different ways:
Manually added by username. Username is any arbitrary string that is used to identify the contact. In other sources, the username can also be an email address.
Manually added by email, marked as a phonebook contact. Source of contact is set to phonebook.
Automatically sync contacts from the local phonebook to Rave.
Automatically sync contacts from Facebook to Rave.
In addition to Rave contacts, the RaveContactsManager can also “fetch” external contacts from Facebook, Google,
and third party contact providers. This retrieves a list of contacts from the specified social network or third part,
but does not store them on the server. This list can then be used for sharing, recommending, and gifting.
Contacts can be filtered by All, Using current application, and Not using current application.
Attention
As of Facebook Graph API 2.0, Facebook will only return friends already using the current application instead of a full list of the user’s friends.
Usage Examples
Update and get a list of all of the current user’s contacts
RaveContactsManager.UpdateAll(delegate (string error) {
        if(error == "") {
                foreach(RaveContact contact in RaveContactsManager.All) {
                        // Process contacts here
                }
        }
});
Fetch a list of contacts from all attached social networks and filter them for only users already using the app. Then process each contact differently depending on if they are a Facebook or Google contact.
RaveContactsManager.FetchAllExternal(RaveContactsFilter.RaveContactsFilterIncludeAll, delegate (List<RaveContact> contacts, string error) {
    if(error == "") {
        foreach(RaveContact contact in contacts) {
            if(contact.isFacebook) {
                // Process Facebook external contacts
            } else if(contact.isGoogleIdentity) {
                // Process Google external contacts
            }
        }
    }
});
Common Contacts Examples#
List All Contacts in One Pass#
RaveContactsManager.UpdateAll(delegate(string error) {
    if(error != "") {
        // handle error
    }
    // process contacts through RaveContactsManager.All
});
Accessing the Cached Contacts#
Most update operations have a corresponding property or function that returns cached data
List<RaveContact> cachedContacts = RaveContactsManager.All;
// process cached contacts
Similarly you can call Facebook/UpdateFacebook, AllUsingThisApplication/
UpdateAllUsingThisApplication to update your Facebook friends and friends who are using this application respectively.
Getting a Random Selection of Contacts From the Game Community#
RaveUsersManager.FetchRandomUsersForApplication2(appUuid, delegate(List<RaveUser> users, string error) {
    if(error != "") {
        //  handle error condition
    }
    if (users != null && users.Count > 0) {
        foreach(RaveUser user in users) {
            // display the user
            string displayName = user.displayName;
            //  save the raveId for later
            string raveId = user.raveId;
            // potentially call addContactById later
        }
    }
});
Adding a Contact#
RaveContactsManager.AddContactsByUsername(usernames, delegate(string error) {
    if (error != "") {
        // handle error condition for adding the contact
    } else {
        // handle the successful addition of a contact
    }
});
Blocking a Contact#
RaveContactsManager.DeleteContact(raveId, delegate(string error) {
    if (error != "") {
        // handle error condition for removing the contact
    } else {
        // handle the successful removing of a contact
    }
});
Updating Contacts#
RaveContactsManager.UpdateAll( delegate(string error) {
    if (error != "") {
        // handle error condition for updating the contacts
    } else {
        // process contacts with RaveContactsManager.All, filter by any of the RaveContact fields,
        // including FB, Google, ThirdParty, etc
    }
});
Achievements#
Rave Social’s achievements API allows the developer to retrieve and unlock achievements associated with the current game and user. Achievements are defined using the Rave portal.
Note
In order to use achievements in your application, you must define your achievements in the Rave Developer Portal. See the Achievements section in the portal documentation for instructions on how to create acheivements.
RaveAchievement#
This class implements a single Rave achievement, containing information about the achievement and the current user’s progress on it (locked or unlocked). The following fields are stored and accessible with a RaveAchievement:
Key - A unique key identifying the achievement
Name - A display name used when showing the achievement
Description - A longer form description of the achievement
ImageUrl - A URL to the icon or image representing this achievement
Unlocked - Whether or not the current player has unlocked (completed the requirements for) this achievement
RaveAchievements#
This class provides static, easy to use references to all functions in the RaveAchievementsManager.
RaveAchievementsManager#
This class implements all functions related to retrieving information about achievements in the Rave API. The manager stores achievements in a local cache that can be retrieved using the “get” family of functions. Before the local cache is used, it should first be updated by retrieving information from the server using the “update” family of functions. After the first update, achievements information can be quickly retrieved from the cache and updated from the server only as needed.
Common Achievements Examples#
List All Achievements#
RaveAchievementsManager.UpdateAchievements(UpdateAchievementsCallback);

void UpdateAchievementsCallback(string error) {
    if (RaveSocial.HasError(error)) {
        // handle error
    }
    // process achievements through RaveAchievementsManager.Achievements
}
Accessing the Cached Achievements#
Most update operations have a corresponding get that returns cached data
List<RaveAchievement> cachedAchievements = RaveAchievementsManager.Achievements
// process cached achievements
Mark an Achievement as Unlocked#
Unlocking an achievement indicates that the current user has completed all requirements to obtain the specified achievement. An achievement is referenced by a string of its unique key
RaveAchievementsManager.UnlockAchievement(achievementKey, UnlockAchievementCallback);

void UnlockAchievementCallback(string error) {
    if (RaveSocial.HasError(error)) {
        // handle error
    }
    // display message indicating successfully unlocked achievement
}
Leaderboards#
The Rave Social leaderboards system allows for various ways to organize and access high score data for your users. The system is designed to not access the server until you tell it to update, caching the last accessed data until then for optimal performance that is customizable to any use case or connectivity situation. Note that when in anonymous mode, you cannot submit scores to leaderboards and leaderboards will not display your scores in them. Also, when you request adjacent scores for a user that doesn’t have a score you will receive data as if their score is the worst possible.
Note
In order to use leaderboards in your application, you must define your leaderboards in the Rave Developer Portal. See the Leaderboards and Tournaments / Timed Leaderboards section in the portal documentation for instructions on how to create leaderboards.
Leaderboards Concepts#
Sorter - The order of a given Leaderboard amongst other Leaderboards. The leaderboard designated “1” for Sorter will be shown first in a list of leaderboards, etc.
Is Ascending - sort order of what the best score is. Used to determine if a new score is best.
High Score - score for this leaderboard
Global Position - ranking over all users
Friends Position - ranking over just the user’s group of friends
Tournaments, or Timed Leaderboards#
Leaderboards can be reset on a given interval, such as hourly, daily, weeklu and monthly. They can also start and end on a given pre-defined schedule.
For information on how to configure a leaderboard reset interval and start and end date, see the Rave Developer Portal, Leaderboards and Tournaments / Timed Leaderboards section.
Android Leaderboard Examples#
Updating and Getting Leaderboards#
You can work with leaderboards and their scores after updating them at least once from the server. It is up to you how often you want to ask the server for updates beyond the first time. After the first call, even if the app is closed and reopened, cached information will be used until the next update request.
RaveLeaderboardManager.UpdateLeaderboards(delegate(string error) {
    if(error != "") {
        // handle exception
    } else {
        List<RaveLeaderboard> leaderboards = RaveLeaderboardManager.Leaderboards;

        //  you can get specific leaderboards
        RaveLeaderboard leaderboard = RaveLeaderboardManager.GetLeaderboardByKey("myLeaderboardKey");
    }
});
Submitting Scores to a Leaderboard#
RaveLeaderboardManager.SubmitScoreByKey("myLeaderboardKey",234042,delegate(string error) {
    if(error == "") {
        // score submitted OK
    }
});
Getting the High Score and Position#
Before you can examine your score you will have to update the leaderboard for which you want detailed information:
// you can also update or get single leaderboards instead of all of them
RaveLeaderboardManager.UpdateLeaderboardByKey("myLeaderboardKey", delegate(string error) {
    if(error != "") {
        // handle error
    }
});
You can easily get the high score and your ranking in a leaderboard: either globally or amongst your friends
float highScore = RaveLeaderboardManager.GetHighScoreByKey("myLeaderboardKey");
Integer globalPosition = RaveLeaderboardManager.GetGlobalPositionByKey("myLeaderboardKey");
Integer friendsPosition = RaveLeaderboardManager.GetFriendsPositionByKey("myLeaderboardKey");
Note: these values will be null if you have not submitted a score
Getting Lists of Scores#
Since leaderboards for games can contain thousands of entries, there are various ways to get subsections of a given leaderboard. Each method has two versions: the global scores version and the scores just amongst your friends
Getting Scores By Absolute Page#
You can get scores in strict pages by specifying the page you want and the number of entries you want in each page. You can access the scores after calling the proper update function.
// for global scores
RaveLeaderboardManager.UpdateGlobalScoresByKey("myLeaderboardKey",1,10,delegate(string error) {
    if(error == "") {
        List<RaveScore> scores = RaveLeaderboardManager.GetGlobalScoresByKey("myLeaderboardKey",1,10);
    }
});

// for scores amongst friends only
RaveLeaderboardManager.UpdateFriendsScoresByKey("myLeaderboardKey",1,10,delegate(string error) {
    if(error == "") {
        List<RaveScore> scores = RaveLeaderboardManager.GetFriendsScoresByKey("myLeaderboardKey",1,10);
    }
});
Getting Scores By Nearby Page#
You can get the page of scores closest to the user’s high score
// for global scores
RaveLeaderboardManager.UpdateMyGlobalScoresByKey("myLeaderboardKey",10,delegate(string error) {
    if(error == "") {
        List<RaveScore> scores = RaveLeaderboardManager.GetMyGlobalScoresByKey("myLeaderboardKey",10);
    }
});

// for scores amongst friends only
RaveLeaderboardManager.UpdateMyFriendsScoresByKey("myLeaderboardKey",10,delegate(string error) {
    if(error == "") {
        List<RaveScore> scores = RaveLeaderboardManager.GetMyFriendsScoresByKey("myLeaderboardKey",10);
    }
});
Getting Scores Adjacent to the User Score#
You can get the scores nearest to a given user’s high score after you call the update function
// for global scores the 15 scores before and 15 scores after the user, if available
RaveLeaderboardManager.UpdateMyGlobalScoresAdjacentByKey("myLeaderboardKey",10,delegate(string error) {
    if(error == "") {
        List<RaveScore> scores = RaveLeaderboardManager.GetMyGlobalScoresAdjancentByKey("myLeaderboardKey",10);
    }
});

// for scores amongst friends only, 15 before and 15 after the user, if available
RaveLeaderboardManager.UpdateMyFriendsScoresAdjacentByKey("myLeaderboardKey",10,delegate(string error) {
    if(error == "") {
        List<RaveScore> scores = RaveLeaderboardManager.GetMyFriendsScoresAdjancentByKey("myLeaderboardKey",10);
    }
});
Getting Scores For Leaderboard From Previous Reset Intervals (ie. last week’s tournament)#
For leaderboards that have a defined Reset Frequency you might want to access the scores from a previous reset period
// Build request. Set version to the leaderboard version you wish to retrieve.
RaveLeaderboardsRequest request = new RaveLeaderboardsRequestBuilder().Key("myLeaderboardKey").Page(1).PageSize(50).Update(true).Version(1).Build();
RaveLeaderboardManager.GetLeaderboardScores(request, delegate (List<RaveScore> scores, string error) {
    // Update UI with new scores.
});
Gifting and Requests#
The Rave Social gifting system allows for players across social environments to interact in a tangible way that can either be used as just a social tool or as a monetizable or incentivized feature in your game. Players can request a gift from another player, which gives that player an opportunity to send back a gift. Gifts may be accepted or rejected by the recipient.
Gifting Concepts#
Gift Type - Any conceptual thing a user can give to another (life, heart, money, etc)
Gift Request - A request from one user to another asking for a gift
Gift - An instance of a gift type which can be accepted or rejected by the recipient
-.. note:: - In order to use gifts or requests in your application, you must define your gifts that can be given or requested in the Rave Developer Portal. See the Gifts section in the portal documentation for instructions on how to create gifts.
Unity Gifting Examples#
Get Gift Types#
RaveGiftsManager.UpdateGiftTypes( delegate(string error) {
    if(error != "") {
        // handle exception
    } else {
        List<RaveGiftType> giftTypes = RaveGiftsManager.GiftTypes;
    }
});

// you can also get gift types by their name
RaveGiftType type = RaveGiftsManager.GetGiftTypeByKey("myGiftTypeKey");
Get Gifts#
RaveGiftsManager.UpdateGifts( delegate(string error) {
    if (error != "") {
        // handle exception
    } else {
        List<RaveGift> gifts = RaveGiftsManager.Gifts;
    }
});
Send Gift#
You can send a gift to other users of the same game, with a limit of 20 users per send call.
RaveGiftsManager.SendGiftsToUsersWithKey(type.typeKey, userIds, delegate(List<string> succeeded, List<string> failed, string error) {
    if (error != "") {
        // handle exception
    } else {
        // optional - handle list of success and failed requests
    }
});
Send Gift Request#
You can request a gift from other users of the same application, with a limit of 20 users per send call.
RaveGiftsManager.RequestGiftWithKey(type.typeKey, userIds, delegate(List<string> succeeded, List<string> failed, string error) {
    if (error != "") {
        // handle exception
    } else {
        // optional - handle list of success and failed requests
    }
});
Get Gift Requests#
RaveGiftsManager.UpdateGiftRequests( delegate(string error) {
    if (error != "") {
        // handle exception
    } else {
    List<RaveGiftRequest> giftRequests = RaveGiftsManager.GiftRequests;
    }
});
Grant/Ignore Gift Request#
RaveGiftsManager.GrantGiftRequestById(giftRequest.requestId, delegate(string error) {
    if (error != "") {
        // handle error
    }
});

RaveGiftsManager.IgnoreGiftRequestById(giftRequest.requestId, delegate(string error) {
    if (error != "") {
        // handle error
    }
});
Accept/Reject Gift#
RaveGiftsManager.AcceptGiftId(gift.giftId, delegate(string error) {
    if (error != "") {
        // handle error
    }
});

RaveGiftsManager.RejectGiftById(gift.giftId, delegate(string error) {
    if (error != "") {
        // handle error
    }
});
Chat#

About Rave and Layer Integration#
Rave Social offers chat services with an out-of-the-box integration with Layer. Sign up for the Layer add-on to allow your users to send and receive messages, subscribe to chat channels and conversations, and view user online/offline statuses.
How it Works#
Let your Rave Account Manager know that you’d like to sign up for the Layer add-on
We configure your Layer app for you and ensure the link between your Layer and Rave applications
We will provide you a Layer URL to add to your application’s Rave configuration files for the RaveSettings.Chat.LayerURL value.
That’s it. Rave SDK wraps Layer’s messaging APIs, so now that your Layer app is configured you can use the Rave SDK to add user to user messaging to your app.
For additional documentation see: https://docs.layer.com
Localization#
Resources can be localized for a region and language using standard ISO 639-1 codes. A localized resource is one that exists in a directory named with the language code or the language-region code pair, such as “en” or “en-us”. Beyond this, resources do not need to receive any special treatment, as any resource in a locale-specific directory will override the same resource in the default resource directory.
Creating Localized Content#
Localizing your project to other languages is done with JSON files.
In /resources/default/strings.json you will see the default translation file. Here you can define what strings will
be displayed for any language that doesn’t have a more specific string in its own language. Usually this JSON is used
for English, but you can make this whatever you want your default language to be. The format for each row is:
"key" : "translated language string",
Let’s look at a few rows from our default version of this file:
"Create your account" : "Create your account",
"OK" : "OK",
"RSEnterEmail" : "Enter the email address you use for your account. We'll email you a temporary password. <a href='http://www.ravesocial.co/help/index.html?rn=password'>Need Help?</a>",
The text to the left of the colon shows the key of the translation. Usually this is the English term in our existing code and XML files. The text to the right of the colon shows what will be substituted. Since this is for our English speaking users, often the string is the same as the key. Note that RSEnterEmail is a key. This is showing how you can put a shorter string in your code that can be substituted with something much longer in the translation file.
Localization Example#
Now let’s create a translation of the application. To localize to a language, simply copy the strings.json file from
/resources/default to /resources/XX where XX is the ISO-639-1 code for the language that you are creating your
localization for. In this example, the localization is for German, which has the country code de.
Now you can edit the value for each key to be translated as shown below:
"Create your account" : "Erstelle Dein Spielekonto",
"OK" : "OK",
"RSEnterEmail" : "Gib die E-Mail-Adresse ein, die Du für Dein Spielekonto verwendest hast. Wir werden Dir ein vorübergehendes Passwort schicken. <a href='http://www.ravesocial.co/help/index.html?rn=password'>Brauchst Du Hilfe?</a>",
Attention
Ensure that the last row in your JSON dictionary does not end with a comma. Strict JSON prohibits this.
When you build and run the application and set the target device’s language as German, any strings for which there are translated values will show up in German.
Upgrading the Rave SDK#
The Rave SDK will always preserve your current user’s RaveID and credentials on upgrade.
Version-specific Upgrade Notes#
v4.2.0 Upgrade Notes#
- Adoption of .xcframework for iOS SDK:
Starting with 4.2.0, the Rave iOS SDK is distributed as an
.xcframework, replacing the previous fat framework format. Unity added support for.xcframeworkin the following versions:If you are using a Unity version older than those listed, upgrading to 4.2.0 may cause linking issues due to the lack of
.xcframeworksupport. To ensure compatibility, update your Unity project to one of the supported versions.
SDK Logging#
Rave Social SDK allows you to configure the log level according to your needs. The Log Level config is available in the Rave Settings panel, which can be accessed through the Rave Social menu in the Unity Editor. To update the configuration:
Click on “Update Configuration” to open the settings panel.
Locate the Log Level config and select the appropriate value based on your requirements:
Quiet - No Logging
Error - Only Errors (default)
Warn - Warnings and Errors
Info - Info, Warnings and Errors
Verbose - Verbose Messages, Info, Warnings and Errors
Debug - Debug Messages and all others included
You can also set the log level by modifying the AndroidManifest.xml file or the application plist.
It’s important to note that setting the log level to Debug may impact the performance of your app, so it’s recommended to only use it for debugging purposes and revert to the default level in production.
SDK Caching Policy#
The RaveSocial SDK implements a common pattern of cache utilization. The SDK accesses most data from caches and only fetches data directly from the back-end service in a small number of instances.. Thus, it is important to populate the cache before certain SDK operations. To this end each API manager has a series of paired methods for each cache it implements: an accessor named <CacheName> and a method to update the cache named Update<CacheName>. In most cases accessors will give direct cache access. Update methods all take a completion callback so that you are notified when it completes and whether the update failed. For example, RaveUsersManager provides cache accessor Current and a cache update method UpdateCurrent that follow this pattern. Some managers also have keyed lookup access so that you can more easily look up specific subsets of data. For example, RaveUsersManager’s GetUserById.
SDK Troubleshooting#
Not receiving any callbacks#
Make sure that the RaveSocial and RaveCallbackManager components are both added to your GameObject before initializing your game.
Facebook is crashing#
Ensure you’re only using the supported Facebook SDK (native)
Social Network State#
Once the player connects Facebook, Google, or the local Phonebook to his account, he will be able to use social features, such as posting to someone’s Facebook wall, directly from the game and from the built in Big Fish Rave personalization experiences. However, this will only be true if there is an authentication token present from the particular social network on the device from which the player was connecting. If the developer starts playing on another device, or wipes the current device, then the token will not be available and the player will have to log into Facebook again. The social network readiness API lets the developer know whether the usage of the social network is currently available for the player. See Checking Readiness Of Social Networks section for more details.